

Portal-Level RegEx Rules already let you validate PO numbers and third-party account numbers automatically across your portal. Now that same validation power extends to Custom Fields, so you can enforce specific formatting requirements — like character limits, required patterns, or restricted characters — on any custom field your users fill out during checkout.
Since Custom Field RegEx rules are built and assigned independently, you can create as many rules as you need and apply different formatting requirements to different fields.
Benefits to You
- Prevent bad data at the source by enforcing formatting rules on custom fields — like required length, allowed characters, or specific patterns — before an order is ever submitted.
- Apply different rules to different fields since each Custom Field RegEx rule is created independently and assigned only to the field(s) you choose.
- Choose the right validation behavior for each rule using the new Evaluate selector, so strict rules like character restrictions block invalid keystrokes immediately, while length-based rules only validate on submit.
- Test before you deploy using the new Tester button to confirm a rule behaves as expected before it goes live on your portal.
How It Works
Creating a Custom Field RegEx rule:
- In the back end, navigate to Portals and select a customer.
- Go to the RegEx Rules tab.
- From the Create a Regex dropdown, select Custom Field.
- Give the rule a name and enter your RegEx definition.
- Use the Evaluate dropdown to choose a validation behavior:
- Reject invalid input while typing (default) — stops users from typing input that doesn’t match the rule. Best for restricting characters or enforcing a maximum length.
- Validate only when typing/submitting — allows typing but blocks submission until the input is valid. Best for rules like exact or minimum length requirements, where blocking mid-typing would be premature.
- Enter an Error Message to display when input doesn’t conform to the rule.
- Optionally, click Tester to confirm the rule behaves as expected.
- Click Save.
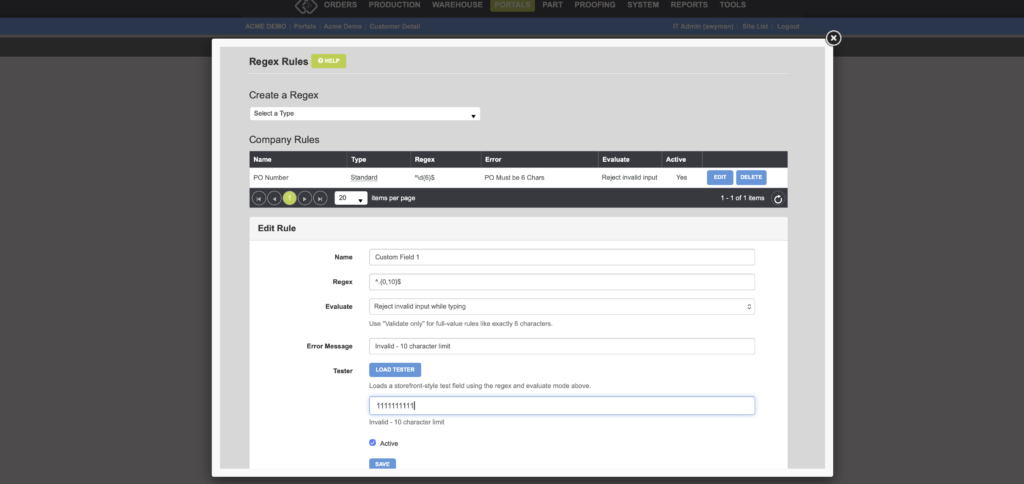
Assigning a rule to a Custom Field:
- In the back end, navigate to Portals and select a customer.
- Go to the Custom Fields tab.
- Select an existing Custom Field or create a new one.
- From the Regex Rule dropdown, select the Custom Field RegEx rule you want to apply.
- Click Save.
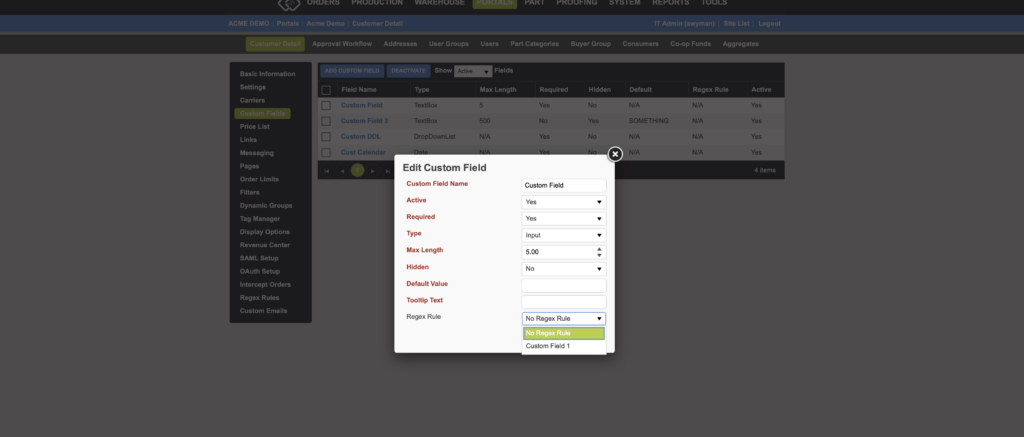
Important Notes
- Unlike PO Number and Third Party Account Number rules, Custom Field RegEx rules only take effect once assigned to a specific Custom Field — creating the rule alone does not enforce it.
- You can create multiple Custom Field RegEx rules and assign different ones to different Custom Fields.
- The Tester and Evaluate additions are also now available for PO Number and Third Party Account Number rules.
If your portal collects custom information at checkout that needs to follow a specific format, Custom Field RegEx rules give you a straightforward way to enforce it.
Want to learn more about validation rules in Propago? Check out our previous Did You Know articles:
If you have any questions or need support, you can contact our support team at: [email protected]
Find all of our Did You Knows here: Knowledge Library