
Public Offers already make it easy to collect orders from people outside your portal — and two new additions make them even more flexible. You can now pre-load a default shipping address for a Public Offer (and optionally lock it down so users can’t change it), and you can add up to five custom fields to collect whatever additional information you need from users as they check out.
Benefits
- Simplify checkout for event-based or location-specific orders — pre-populate a shipping address so users don’t have to enter one, reducing friction and the chance of orders being shipped to the wrong place.
- Enforce a fixed shipping destination when needed — hiding the address fields means users check out faster and you maintain full control over where orders are sent.
- Collect custom information tailored to each Public Offer — whether it’s a cost center, department, event name, or any other detail, custom fields let you gather exactly what you need without any development work.
How It Works
Both features are configured in the Basic Information page of the Public Offer in the back end (Parts > Offers > Select a Public Offer).
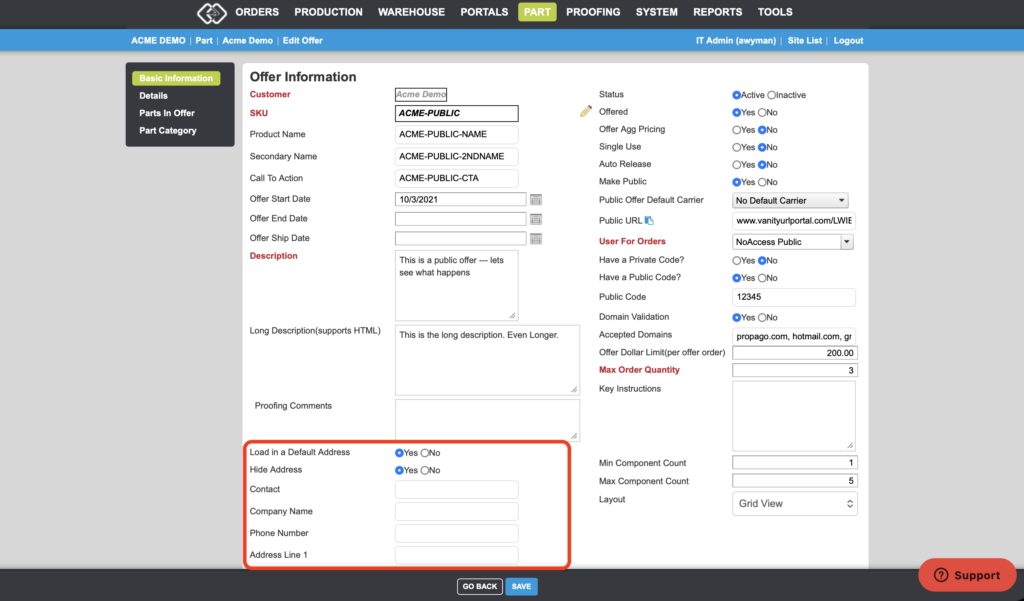
Setting Up a Default Address
- Navigate to the Public Offer’s Basic Information page.
- Find the Load in a Default Address setting and set it to Yes.
- A set of address fields will appear — fill in the Contact Name, Company Name, Phone Number, and standard address fields with the default shipping address for this Public Offer.
- Save your changes. Users ordering this Public Offer will now have this address pre-populated at checkout.
Hiding the Default Address from Users
- In the same Basic Information page, locate the Hide Address setting.
- Set it to Yes.
- Save. The pre-loaded address will now be used automatically and the address fields will be hidden from users, making the default address uneditable during checkout.
Adding Custom Fields
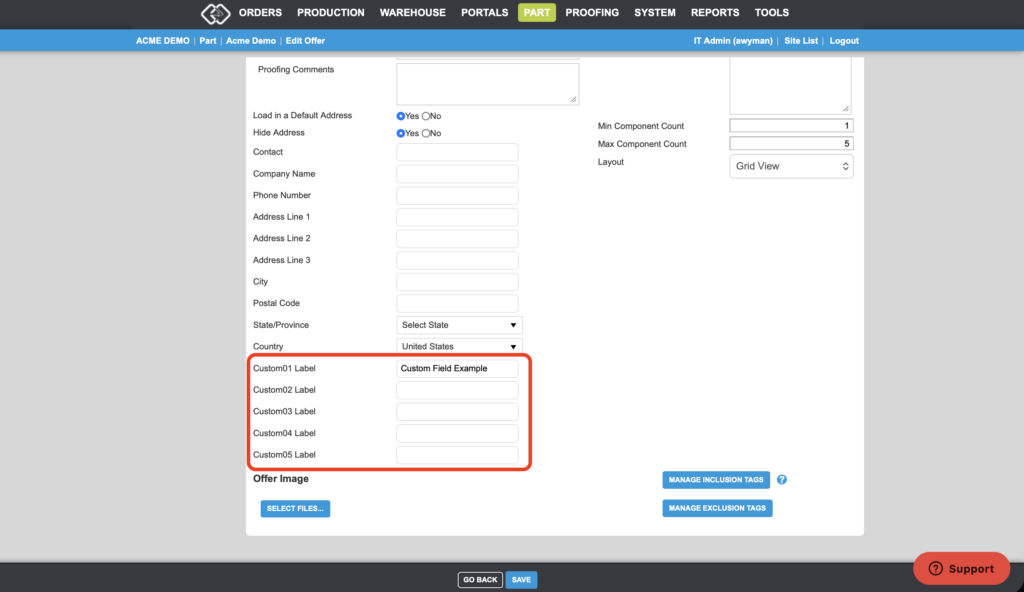
- In the Basic Information page of the Public Offer, locate the Custom01 Label through Custom05 Label settings.
- Enter the label text you want users to see for each custom field you wish to enable. For example, entering Cost Center in the Custom01 Label field will display an optional Cost Center field to users during checkout.
- Leave any custom label fields blank that you don’t want to use — only fields with a label entered will appear on the front end.
- Save your changes.
Users will see the enabled custom fields as optional inputs when checking out the Public Offer.
Key Notes
- Load in a Default Address and Hide Address work together — the Hide Address setting is most useful when a default address has already been loaded in, ensuring users are directed to the right destination without being able to override it.
- Custom fields created via the Custom Label settings are optional for users — they are not required fields.
- Up to five custom fields (Custom01–Custom05) can be enabled per Public Offer.
Whether you’re running a pop-up shop for a specific location or collecting orders for a special event, these new settings give you sharper control over how your Public Offers work from end to end.
If you have any questions or need support, you can contact our support team at: [email protected]
Find all of our Did You Knows here: Knowledge Library